


Learning how to hang a growth chart may seem easy, but a small mistake can affect every height mark you add later. If the chart is too high, tilted, or placed from the wrong starting point, your child’s measurements may not be accurate.
The good news is that growth chart installation does not have to be difficult. With a measuring tape, level, pencil, and the right mounting hardware, you can create a safe and accurate setup in a few simple steps.
Whether you have a wooden growth chart, child growth chart, or ruler growth chart, the most important rule is to follow the chart’s measurement instructions. Always check the zero mark before you attach anything to the wall.
You can also read: Growth Spurt Signs in Kids: Ages & 6 Key Symptoms
Key Takeaways:
- Always check the chart’s zero mark before mounting it. Do not assume the bottom edge should touch the floor.
- Choose a smooth, dry, visible wall with enough space for your child to stand and grow.
- Use a measuring tape and level to keep the chart accurate and straight.
- Pick wall anchors, screws, hooks, or damage-free mounting strips based on your wall and the chart’s weight.
- Keep the chart away from damp areas, busy doorways, and places where furniture can block it.
- Leave enough room around the chart for future growth measurements and family memories.
- If you plan to move the chart later, choose a mounting method that allows easy removal and repositioning.
A growth chart is more than a ruler on a wall. It becomes a visual record of how quickly your child changes from year to year. That makes accurate placement important from the very first measurement.
The easiest way to get it right is to slow down before drilling or sticking anything to the wall. Measure first, check the height placement, level the chart, and then secure it.
Preparation: Choosing The Right Wall For Your Wooden Growth Chart

Choosing the right location is the first major part of how to hang a growth chart correctly. The wall should be easy to access, easy to see, and strong enough for the selected mounting method.
A good location also needs enough open space. Your child should be able to stand upright without a sofa, cabinet, toy box, or other furniture getting in the way.
Whether you have a boy’s growth chart, girl’s growth chart, personalized ruler, or another wooden growth chart, think about how the space will work several years from now.
Consider Everyday Visibility
Choose a wall that your family uses often. A hallway, bedroom, playroom, or family room can work well.
Daily visibility makes it easier to remember regular measurements. It also turns height checks into a small family tradition.
Avoid hiding the growth chart behind a door or large piece of furniture. A chart that is difficult to reach may eventually be forgotten.
You can also think about photographs. A well-lit wall can make yearly height photos look much better.
The best location is usually one that combines convenience with protection. You want the chart to be easy to reach without placing it somewhere it can get bumped every day.
Accessibility for All Ages
Your child should have enough room to stand naturally beside the child height chart.
Keep furniture away from the measuring area. A bed, chair, shelf, or toy chest can make it hard for a child to stand straight.
Leave open space above and below the chart as well. Children may use the chart for many years, so the area should remain practical as they get taller.
Think about the adults who will take measurements too. You should be able to stand beside your child, place the measuring tool correctly, and read the mark without stretching or leaning.
Good growth chart placement should work for the whole family.
Lighting Matters
Good lighting makes a growth chart easier to read.
Natural light can work well, but you do not need to place the chart directly in strong sunlight. Constant sunlight may affect some finishes over time.
A warm lamp or bright room light can also make the chart easier to use.
If you plan to take yearly photos, choose a location with enough light for clear pictures. This turns each height measurement into a simple visual memory.
Avoid very dark corners where the markings are difficult to see.
Avoid Humid or Busy Spots
Humidity can affect some wooden products. For this reason, avoid placing a wooden growth chart directly in a bathroom or another damp area.
You should also be careful near exterior doors, windows with moisture problems, or areas with large temperature changes.
Busy walkways can create another problem. A chart placed where people constantly bump into it may loosen or become damaged.
Try to find a wall that is dry, stable, and protected from heavy traffic.
Think About Future Memories
A growth chart can stay with your family for years. Some families even take it with them when they move.
Before choosing a wall, ask yourself whether the location will still work if the room changes.
For example, a playroom may later become a study room. A child’s bedroom may also change as they grow.
Pick a place that can adapt to your family’s needs.
The right location should make the chart feel like part of your home rather than something that was added as an afterthought.
Measured Placement: What Height Should A Growth Chart Start At?
One of the most common mistakes is assuming that the bottom of the chart should sit directly on the floor.
That is not always correct.
Many ruler growth charts have a zero mark that begins several inches above the bottom edge. The correct installation point depends on how the chart was designed.
Before you mount the chart, find the zero measurement. Then follow the manufacturer’s instructions for positioning that mark.
This simple check can prevent years of incorrect measurements.
| What to Check | Why It Matters |
| Zero mark | It determines where accurate height tracking begins |
| Floor level | Helps establish the correct reference point |
| Baseboard | May push the chart away from the wall |
| Chart height | Makes sure the full measuring range fits |
| Wall space | Gives your child room to stand correctly |
| Level | Keeps the scale vertically aligned |
Never rely only on the bottom edge of a wooden growth chart. The printed or engraved measurement marks are what matter.
Measuring For Success: Why Most People Hang A Child Growth Chart Wrong

Many people think how to hang a growth chart means simply putting a ruler on the wall.
The actual process requires more care.
If the chart starts from the wrong point, every future measurement can be wrong. If it leans to one side, the height marks may not line up correctly.
The goal is simple: create a stable reference point that remains consistent every time you measure your child.
Skipping the Instructions in the Rush to Install
Excitement can make installation feel like a five-minute job.
That is when mistakes happen.
Before making a hole or attaching adhesive, read the instructions that came with your growth chart. If the manufacturer provides an installation guide or video, review it first.
Different charts can use different mounting systems. Some have hanging hardware already attached. Others may require specific screws, hooks, or anchors.
Do not assume every chart installs in the same way.
Taking a few extra minutes at the start can save you from moving the chart later.
The “Zero Mark” Misconception
The zero mark is one of the most important details in growth chart installation.
Many people assume the bottom of a child growth chart represents zero inches. That may not be true.
Some charts intentionally place the first measurement above the bottom edge.
Find the zero mark before deciding where the chart will sit.
For example, if the instructions say the zero mark should be six inches above the floor, measure six inches from the floor to that specific mark. Do not measure six inches to the bottom of the chart unless the instructions say to do so.
This distinction keeps your height tracking accurate.
Forgetting Level Placement
A crooked chart may look like a small problem, but it can affect the measuring experience.
Use a bubble level to check the chart before securing it.
Hold the chart in position and check its vertical alignment. Adjust it until the bubble sits in the correct position.
Then mark your mounting points.
This is one of the easiest ways to improve growth chart placement.
Not Accounting for Baseboards
Baseboards can change how closely a chart sits against the wall.
If your baseboard sticks out several inches, the bottom of the chart may not sit flat. This can create an awkward angle or affect the way the chart is positioned.
Measure the wall carefully before installation.
If needed, position the chart above the baseboard according to the manufacturer’s instructions.
Do not remove a baseboard simply to install a growth chart unless you know what you are doing. A better mounting solution is often enough.
Overlooking Room Flow and Visibility
A beautiful chart is not useful if furniture blocks it.
Check the area from different angles before you install it.
Open nearby doors. Move chairs or toys around. Think about where your child will stand during a measurement.
A good wall should give you enough room to measure without moving half the room every time.
Choose a place that is visible, safe, and convenient.
How To Hang A Growth Chart In 7 Simple Steps

Now that you know how to choose the location, you can move on to the actual installation.
Step 1: Choose the Wall
Select a flat, dry wall with enough open space.
Make sure your child can stand straight beside the chart.
Step 2: Find the Zero Mark
Locate the zero mark on the growth chart.
Read the manufacturer’s instructions to determine how far this mark should sit above the floor.
Step 3: Measure the Starting Height
Use a measuring tape to measure from the floor.
Mark the correct position lightly with a pencil.
Step 4: Position the Chart
Hold the chart against the wall.
Use painter’s tape to help hold it temporarily if needed.
Step 5: Check the Level
Place a level along the chart.
Adjust it until the chart is straight.
Step 6: Mark the Mounting Points
Mark where the screws, hooks, anchors, or adhesive strips will go.
Double-check the measurements before making permanent changes.
Step 7: Secure the Chart
Install the selected mounting hardware.
Once the chart is secure, check the zero mark one more time.
This simple process makes how to hang a growth chart much easier and reduces common installation errors.
Essential Tools For Hanging A Growth Chart Without Damage

Having the right tools makes the job faster and cleaner.
You do not need a large toolbox. Most installations can be completed with a few basic items.
Measuring Tape
A measuring tape helps you establish the correct starting height.
Use it to measure from the floor to the zero mark rather than guessing.
Accurate measurement at the beginning protects every future record.
Painter’s Tape
Painter’s tape can help you test the position before making permanent marks.
You can use it to hold the chart temporarily while you check its height and alignment.
It can also help you visualize where the chart will sit.
Use a tape designed for painted surfaces and remove it carefully.
Level
A level is one of the most useful tools for growth chart installation.
Even if the chart looks straight to your eyes, a level gives you a more reliable check.
Use it before marking the mounting points.
Pencil
A pencil is ideal for temporary wall marks.
You can lightly mark the mounting locations and erase them later if necessary.
Avoid using permanent ink on the wall during the installation stage.
Damage-Free Mounting Strips
Damage-free mounting strips can be useful for lighter charts when the wall and product instructions allow adhesive mounting.
Always check the weight rating before using them.
The adhesive should also be suitable for your wall surface.
Do not assume that every strip can safely hold every wooden growth chart.
Soft Cloth
A soft cloth helps remove dust from the wall before mounting.
For adhesive systems, a clean surface is especially important.
If you use a damp cloth, allow the wall to dry fully before applying the mounting product.
Securing Your Investment: Best Hardware For A Permanent Installation
The right mounting hardware depends on the chart’s weight, wall material, and whether you want a permanent or removable setup.
| Mounting Method | Best For | Main Benefit |
| Wall anchors | Drywall or plaster | Extra support |
| Screws | Studs or solid surfaces | Strong hold |
| Picture hooks | Lighter charts | Easy installation |
| Adhesive strips | Suitable lightweight charts | Less wall damage |
| Manufacturer hardware | Compatible growth charts | Designed for the product |
Always check the weight of your chart and the load rating of the hardware before installation.
Wall Anchors: Reliable Support For Every Surface
Wall anchors provide additional support when a screw cannot go directly into a wall stud.
They can be useful for drywall and some plaster surfaces.
Choose an anchor that matches your wall type and the weight of the chart.
If you are unsure which anchor to use, check the hardware manufacturer’s instructions.
For a heavier wooden growth chart, stronger mechanical support may be a better choice than adhesive alone.
Screws: Sturdy, Long-lasting Hold
Screws can provide a strong, long-term installation.
If possible, mounting into a wall stud gives you a solid attachment point.
If a stud is not available, use the correct wall anchor for your wall type.
Choose hardware that suits the chart rather than selecting a screw only because it looks attractive.
A secure installation matters more than the finish of the screw head.
Picture Hanging Hooks: Clean and Adjustable
Picture hanging hooks can be useful when you want a simpler installation or may need to move the chart later.
Choose hooks that can support more than the weight of your growth chart.
Install them at the marked locations and check the chart with a level.
If your chart is heavy, follow the manufacturer’s mounting recommendations instead of relying on a lightweight picture hook.
Level and Measuring Tape: Invisible Tools, Visible Perfection
A level and measuring tape may not be visible once the installation is complete, but they help create accurate results.
The tape establishes the correct starting point.
The level keeps the chart straight.
Together, they reduce two of the most common mistakes in growth chart placement.
Growth Chart Installation On Different Wall Types
Not every wall can use the same mounting method.
Before installing your chart, identify the surface.
| Wall Type | General Mounting Approach |
| Drywall | Suitable wall anchor or stud |
| Plaster | Appropriate plaster-rated hardware |
| Wood | Screw into solid wood when suitable |
| Brick | Masonry-rated anchor and screw |
| Concrete | Concrete/masonry mounting hardware |
| Textured wall | Use a compatible mounting method; avoid weak adhesive-only setups |
For unusual surfaces, follow the instructions for the specific hardware.
Do not use a mounting method simply because it worked on another wall.
Marking Milestones: Tips For Writing On Your Wooden Ruler Growth Chart
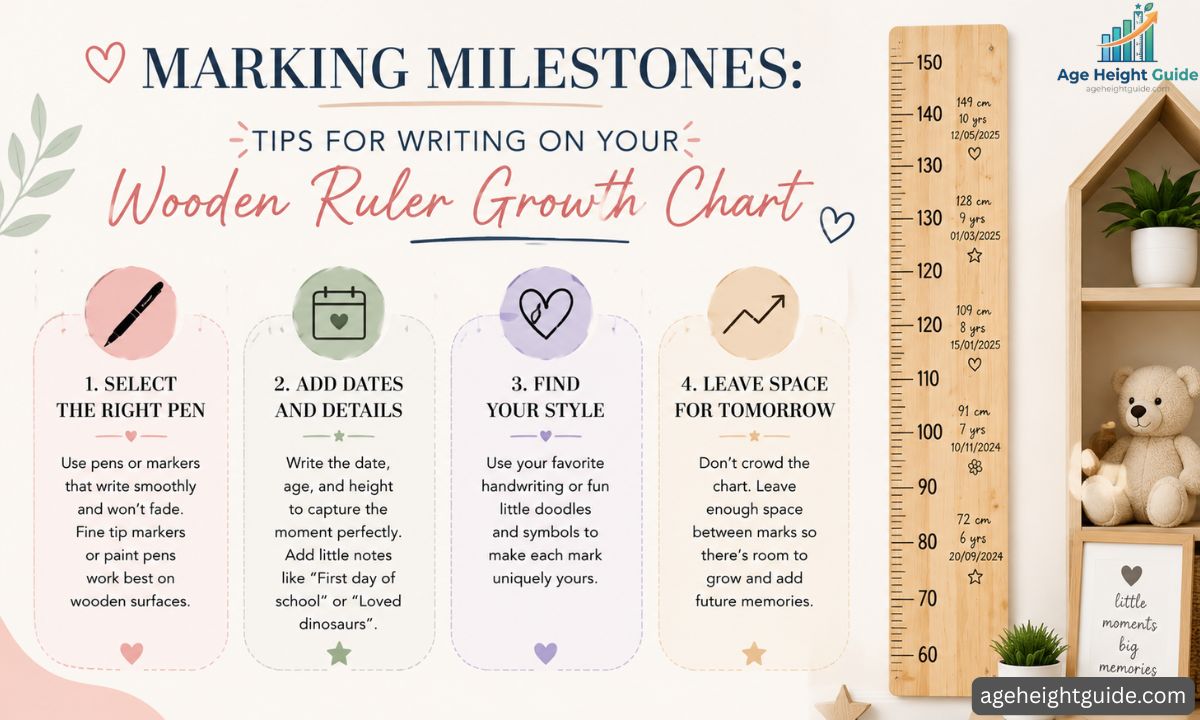
Once you learn how to hang a growth chart, the next fun part is recording memories.
A wooden ruler growth chart can become a timeline of your child’s life.
Each mark can represent more than height. You can add dates, small notes, school milestones, or other memories.
Select the Right Pen
Choose a pen or marker that works well with the chart’s surface.
A fine-tipped archival-quality pen can help keep writing clear.
If the chart manufacturer recommends a specific writing tool, follow that advice.
Test your chosen pen on an appropriate hidden area or follow the product’s care instructions before writing on the main surface.
Add Dates and Details
Height is only one part of the memory.
You can add the date next to the measurement.
You might also write a short note such as:
“First Day of Kindergarten”
“Lost First Tooth”
“Started Soccer”
“Learned to Ride a Bike”
These details can make the growth chart more meaningful years later.
Find Your Style
There is no single right way to personalize a chart.
Some families prefer simple dates and heights.
Others enjoy small drawings, stickers, symbols, or handwritten notes.
You can even let your child add their own handwriting as they get older.
The goal is to create a personal record that feels like your family.
Leave Space for Tomorrow
Do not fill every available space too early.
Children continue to grow, and your family will create new memories.
Leave enough room for future growth measurements and notes.
If the chart is designed to cover many years, think long-term when adding decorations.
Common Growth Chart Hanging Mistakes To Avoid

Even a simple installation can go wrong if you rush.
Here are some of the most common errors to watch for.
Measuring From the Bottom Instead of the Zero Mark
The bottom edge is not always the measurement starting point.
Always locate the zero mark first.
Hanging the Chart Without Checking the Level
A chart can look straight while still being slightly tilted.
Use a level before securing it.
Ignoring the Baseboard
A thick baseboard can push the chart away from the wall.
Check the wall profile before installation.
Choosing Hardware Without Checking Weight
A mounting strip or hook must support the chart safely.
Check the product’s weight rating.
Installing Too Close to Furniture
Your child needs enough room to stand naturally.
Move furniture away from the measuring area.
Choosing a Damp Location
Moisture can be hard on some wood products.
Choose a dry indoor wall whenever possible.
Marking the Wall Before Double-Checking
Measure twice before drilling or attaching permanent hardware.
A few extra seconds can prevent unnecessary holes.
Why Quality Matters: The Benefit Of A Warp-Resistant Headwaters Studio Chart

The quality of a growth chart matters because families often use these pieces for many years.
A well-made wooden growth chart should remain stable, readable, and attractive when cared for correctly.
For shoppers comparing different charts, look at the materials, finish, mounting system, measurement design, and care instructions.
Lasting Through Generations
A warp-resistant chart can help preserve the appearance and accuracy of its markings over time.
Wood can react to moisture and environmental changes, so proper care and placement still matter.
A quality chart combined with a stable indoor environment can become a lasting family keepsake.
If you plan to move, choose a chart and mounting system that can be handled carefully during repositioning.
Safe for Every Family
Children’s products should be selected with care.
Look for clear information about the materials, finishes, and inks used on the product.
A chart may be placed in a bedroom, playroom, or family room, so it should fit naturally into the space.
Always follow the manufacturer’s care and installation instructions.
Crafted to Blend In and Stand Out
A growth chart does not have to look like a temporary measuring tool.
A well-designed ruler growth chart can become part of your room’s décor.
Wood finishes, themes, colors, and personalized details can make the chart feel special.
You can choose a style that matches the child’s room while keeping the measurement marks easy to read.
Built to Be a Memory
The numbers on a growth chart tell one story.
The notes beside them tell another.
A mark from age three may remind you of a favorite toy. A mark from age five may bring back memories of the first school year.
That is why a child growth chart can become more valuable with time.
The chart records growth, but the memories make it personal.
How To Hang A Growth Chart Without Damaging The Wall
If you rent your home or want to avoid unnecessary holes, plan the mounting method before installation.
For lighter charts, an approved damage-free mounting system may work if the wall surface and product weight are suitable.
For heavier charts, mechanical hardware may offer better support.
Here are the key things to consider:
| Goal | Better Approach |
| Minimal wall marks | Suitable removable strips |
| Strong permanent hold | Stud or suitable anchor |
| Easy removal | Compatible hooks or removable hardware |
| Heavy chart | Rated screws and anchors |
| Rental wall | Follow adhesive product limits |
Never exceed the mounting product’s weight rating.
Also remember that paint condition matters. Even a removable product can affect weak or poorly bonded paint.
Can You Move A Growth Chart Later?
Yes, many growth charts can be removed and repositioned.
However, the new location must be measured carefully.
You cannot simply move the chart and continue measuring without checking the reference point.
Before reinstalling it:
- Find the zero mark.
- Measure the required distance from the floor.
- Check the new wall.
- Use a level.
- Reinstall the correct hardware.
- Confirm the chart is secure.
This keeps measurements consistent even after a move.
Final Thoughts
Knowing how to hang a growth chart correctly can save you from inaccurate measurements and unnecessary wall damage.
The process starts with the right wall. Then you need to find the zero mark, measure the correct starting height, check the chart with a level, and select suitable mounting hardware.
Do not rush the first installation.
A few minutes of careful measuring can protect years of memories.
Whether you choose a wooden growth chart, child height chart, ruler growth chart, or personalized design, place it somewhere your family can easily use and enjoy.
The best growth chart placement combines accuracy, safety, visibility, and enough room for future milestones.
When installed correctly, your chart can become more than a way to record height. It can become a simple family tradition that lets you look back and remember just how small your child once was.
Frequently Asked Questions
How high should I hang the growth chart from the floor?
The correct height depends on the chart’s design. Do not assume that the bottom edge should sit at floor level. Find the zero mark and follow the manufacturer’s instructions for how far that mark should be from the floor. Some charts may require the zero mark to sit several inches above the floor.
What surface is best for hanging a growth chart?
A smooth, flat, dry wall is usually easiest. Painted drywall, finished wood, and smooth plaster can work with the right mounting hardware. Avoid heavily textured, damp, or unstable surfaces unless you have a mounting method designed for them.
How do I make sure the growth chart is straight?
Use a bubble level. Hold the chart against the wall and check its vertical alignment. Adjust it until the level shows that the chart is straight. Then mark your mounting points. Checking the level before installation is much easier than correcting a crooked chart later.
Can I remove and reposition the growth chart easily?
Many charts can be removed and repositioned, but the method depends on the hardware. If you expect to move the chart, choose a suitable removable mounting system from the beginning. After moving it, always measure the new location from the correct reference point before recording another height.
How do I avoid damaging the wall while hanging the chart?
Start by choosing the correct mounting method for your wall and the chart’s weight. For lighter charts, suitable damage-free mounting strips may work. For heavier charts, screws and appropriate wall anchors may provide stronger support. Always follow the weight rating and installation instructions for your selected hardware.
How do I clean the wall before hanging the chart?
Use a clean, soft cloth to remove dust. If the wall needs a damp wipe, allow it to dry completely before applying adhesive mounting products. A clean and dry surface helps suitable adhesive systems perform as intended.
Can I hang a wooden growth chart above a baseboard?
Yes, depending on the chart design and installation instructions.
The key is to make sure the zero mark is positioned at the correct height. Do not let the baseboard change your reference point. Measure from the floor according to the chart’s instructions and make sure the chart sits securely.
Should a growth chart be perfectly vertical?
Yes. A growth chart should be properly aligned so the measurement scale remains consistent. Use a level to check it before securing the mounting hardware. A slight tilt may not look serious, but accurate alignment is important when you plan to track height over several years.
What is the best place to hang a child growth chart?
Choose a visible, dry, low-traffic area with enough space for your child to stand straight. Bedrooms, playrooms, family rooms, and suitable hallways can all work. Avoid placing the chart behind doors, beside furniture that blocks access, or in damp areas.
How often should I measure my child’s height?
There is no need to mark the chart every day. Many families choose birthdays, school milestones, or another regular schedule. The most important thing is consistency. Use the same basic measuring method each time so your growth measurements are easier to compare.
What should I write on a growth chart?
You can record the date and height, then add a short memory. Examples include a first school day, birthday, lost tooth, new hobby, or another family milestone. A personalized growth chart becomes more meaningful when the measurements are connected to real memories.
What tools do I need to hang a growth chart?
Most installations need a measuring tape, level, pencil, and suitable mounting hardware. You may also use painter’s tape for temporary positioning and a soft cloth for cleaning the wall. The exact tools depend on the chart and wall type.
Can I use adhesive strips on drywall?
You may be able to use them if the chart is light enough and the adhesive product is rated for the surface and weight. Check the manufacturer’s weight limit and installation instructions . For a heavy wooden growth chart, a stronger mounting method may be more suitable.
How do I keep growth measurements accurate after moving?
Reinstall the chart using the same measurement reference. Find the zero mark, measure its correct position from the floor, and check the chart with a level.D o not continue using the old wall position as your reference. A fresh installation should always be measured carefully.

Stoke is the author behind Age Height Guide, creating simple and informative content about average height, age, growth, and related measurements.